安装依赖:
dnf update && dnf install automake autoconf gcc gcc-c++ git zstd zlib zlib-devel pcre pcre-devel openssl openssl-devel libxslt libxslt-devel libtool gd gd-devel make perl perl-devel tar vim nano wgetCentos-Stream10安装pcre pcre-devel
dnf install https://rpmfind.net/linux/fedora/linux/releases/42/Everything/x86_64/os/Packages/p/pcre-8.45-1.fc42.8.x86_64.rpmdnf install https://rpmfind.net/linux/fedora/linux/releases/42/Everything/x86_64/os/Packages/p/pcre-utf16-8.45-1.fc42.8.x86_64.rpmdnf install https://rpmfind.net/linux/fedora/linux/releases/42/Everything/x86_64/os/Packages/p/pcre-utf32-8.45-1.fc42.8.x86_64.rpmdnf install https://rpmfind.net/linux/fedora/linux/releases/42/Everything/x86_64/os/Packages/p/pcre-cpp-8.45-1.fc42.8.x86_64.rpmdnf install https://rpmfind.net/linux/fedora/linux/releases/42/Everything/x86_64/os/Packages/p/pcre-devel-8.45-1.fc42.8.x86_64.rpmgit clone https://github.com/leev/ngx_http_geoip2_module.gitwget https://github.com/maxmind/libmaxminddb/releases/download/1.12.2/libmaxminddb-1.12.2.tar.gz && tar -zxvf libmaxminddb-1.12.2.tar.gz && cd libmaxminddb-1.12.2 && ./configure或者存储库git下载编译libmaxminddb
git clone --recursive https://github.com/maxmind/libmaxminddbcd libmaxminddb && ./bootstrap && ./configuremake && make install && ldconfig && cd校准时间:
ln -sf /usr/share/zoneinfo/Asia/Shanghai /etc/localtime && date -R下载/安装/解压 openssl-3.5.2
wget -nc --no-check-certificate https://github.com/openssl/openssl/releases/download/openssl-3.5.2/openssl-3.5.2.tar.gz && tar -zxvf openssl-3.5.2.tar.gz下载/解压 nginx-1.28.0:
wget -nc --no-check-certificate https://nginx.org/download/nginx-1.28.0.tar.gz && tar -zxvf nginx-1.28.0.tar.gz删除 nginx-1.28.0.tar.gz:
rm -rf nginx-1.28.0.tar.gz && rm -rf openssl-3.5.2.tar.gz && rm -rf libmaxminddb-1.12.2.tar.gz && cd nginx-1.28.0添加编译插件:
./configure --prefix=/etc/nginx \
    --with-threads \
    --with-file-aio \
    --with-http_ssl_module \
    --with-http_v2_module \
    --with-http_v3_module \
    --with-http_realip_module \
    --with-http_sub_module \
    --with-http_gzip_static_module \
    --with-http_auth_request_module \
    --with-http_secure_link_module \
    --with-http_stub_status_module \
    --with-cc-opt='-march=native -O3' \
    --with-stream \
    --with-stream_ssl_module \
    --with-stream_realip_module \
    --add-dynamic-module=../ngx_http_geoip2_module \
    --with-stream_ssl_preread_module \
    --with-compat \
    --with-openssl-opt=enable-tls1_3 \
    --with-openssl=../openssl-3.5.2
编译/安装 nginx-1.28.0:
make && make install配置nginx-1.28.0服务:
cat >/etc/systemd/system/nginx.service <<EOF
[Unit]
Description=A high performance web server and a reverse proxy server
Documentation=man:nginx(8)
After=network.target nss-lookup.target

[Service]
Type=forking
PIDFile=/etc/nginx/logs/nginx.pid
ExecStartPre=/etc/nginx/sbin/nginx -t -q -g 'daemon on; master_process on;'
ExecStart=/etc/nginx/sbin/nginx -g 'daemon on; master_process on;'
ExecReload=/etc/nginx/sbin/nginx -g 'daemon on; master_process on;' -s reload
ExecStop=-/sbin/start-stop-daemon --quiet --stop --retry QUIT/5 --pidfile /etc/nginx/logs/nginx.pid
TimeoutStopSec=5
KillMode=mixed

[Install]
WantedBy=multi-user.target
EOF
添加配置文件:
mkdir -p /etc/nginx/ssl /etc/systemd/system/nginx.service.d && printf "[Service]\nExecStartPost=/bin/sleep 0.1\n" > /etc/systemd/system/nginx.service.d/override.confwget -P /etc/nginx/GeoLite2 https://raw.githubusercontent.com/P3TERX/GeoLite.mmdb/download/GeoLite2-Country.mmdb返回列表删除文件夹
cd && rm -rf nginx-1.28.0 openssl-3.5.2 ngx_http_geoip2_module libmaxminddb-1.12.2安装wordpress
cd /etc/nginx/html && wget https://cn.wordpress.org/latest-zh_CN.zip && unzip latest-zh_CN.zip && mv wordpress/* /etc/nginx/html && rm -rf latest-zh_CN.zip wordpress && cd安装nginx配置文件
vim /etc/nginx/conf/nginx.conf在第一行添加
load_module /etc/nginx/modules/ngx_stream_module.so;
load_module /etc/nginx/modules/ngx_http_geoip2_module.so;
user  root;
http {
添加
include conf.d/default.conf;
	# GeoIP2 国家识别
	map $http_x_forwarded_for $clientRealIp {
		"" $remote_addr;
		~^(?P<firstAddr>[0-9\.]+),?.*$ $firstAddr;
	}
	geoip2 /etc/nginx/GeoLite2/GeoLite2-Country.mmdb {
		auto_reload 5m;
		$geoip2_data_country_code default=XX source=$clientRealIp country iso_code;
	}
	map $geoip2_data_country_code $allowed_country {
		CN      yes;
		JP      yes;
		HK      yes;
		US      yes;
		default no;
	}
server {下的
location / {添加
	if ($allowed_country = no) {
	    return 404;
	}
添加dhparam
curl https://ssl-config.mozilla.org/ffdhe2048.txt > /etc/nginx/ssl/dhparam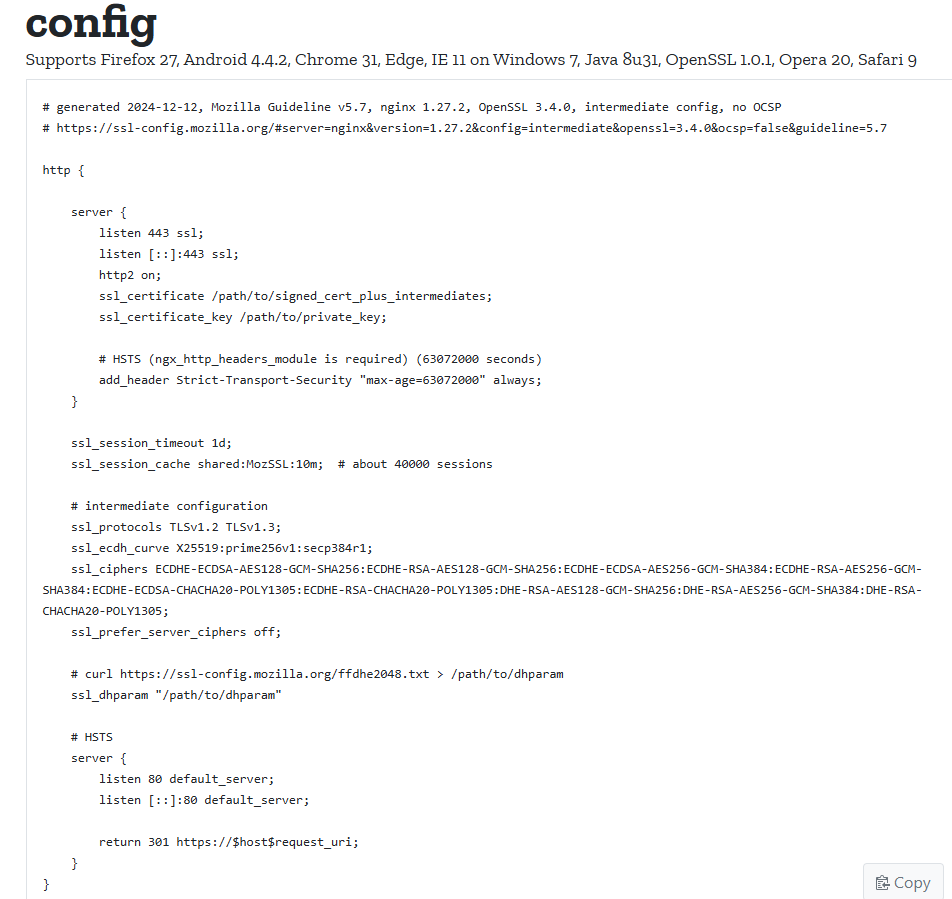
安装 php:
搜索可下载的PHP模块。
dnf module list php启用PHP 8.3模块。
dnf module enable php:8.3安装PHP 及扩展
dnf install php php-fpm php-bcmath php-cli php-common php-gd php-mbstring php-mysqlnd php-pdo php-soap php-xml php-opcache -y安装PHP 8.4
dnf install https://rpmfind.net/linux/remi/enterprise/9/modular/x86_64/php-common-8.4.12-1.el9.remi.x86_64.rpmdnf install https://rpmfind.net/linux/remi/enterprise/9/modular/x86_64/php-8.4.12-1.el9.remi.x86_64.rpmdnf install https://rpmfind.net/linux/remi/enterprise/9/modular/x86_64/php-fpm-8.4.12-1.el9.remi.x86_64.rpmdnf install https://rpmfind.net/linux/remi/enterprise/9/modular/x86_64/php-bcmath-8.4.12-1.el9.remi.x86_64.rpmdnf install https://rpmfind.net/linux/remi/enterprise/9/modular/x86_64/php-cli-8.4.12-1.el9.remi.x86_64.rpmdnf install https://rpmfind.net/linux/remi/enterprise/9/modular/x86_64/php-gd-8.4.12-1.el9.remi.x86_64.rpmdnf install https://rpmfind.net/linux/remi/enterprise/9/remi/x86_64/oniguruma5php-6.9.9-2.el9.remi.x86_64.rpmdnf install https://rpmfind.net/linux/remi/enterprise/9/modular/x86_64/php-mbstring-8.4.12-1.el9.remi.x86_64.rpmdnf install https://rpmfind.net/linux/remi/enterprise/9/modular/x86_64/php-pdo-8.4.12-1.el9.remi.x86_64.rpmdnf install https://rpmfind.net/linux/remi/enterprise/9/modular/x86_64/php-mysqlnd-8.4.12-1.el9.remi.x86_64.rpmdnf install https://rpmfind.net/linux/remi/enterprise/9/modular/x86_64/php-soap-8.4.12-1.el9.remi.x86_64.rpmdnf install https://rpmfind.net/linux/remi/enterprise/9/modular/x86_64/php-xml-8.4.12-1.el9.remi.x86_64.rpmdnf install https://rpmfind.net/linux/remi/enterprise/9/modular/x86_64/php-opcache-8.4.12-1.el9.remi.x86_64.rpm安装完成后检查版本
php --version搜索可下载的mariadb模块
dnf module list mariadb启用mariadb 10.11模块。
dnf module enable mariadb:10.11安装 MariaDB
默认情况下,Rocky9 基础存储库中提供了 MariaDB。现在我们运行以下命令将 MariaDB 安装到您的系统
dnf install mariadb mariadb-server安装完成后检查版本:
mariadb --version修改/etc/php-fpm.d/www.conf
sed -i 's/^user = apache/user = nginx/' /etc/php-fpm.d/www.confsed -i 's/^group = apache/group = nginx/' /etc/php-fpm.d/www.conf- user = apache
- group = apache
- 改为
- user = nginx
- group = nginx
赋予html文件夹权限
chown -R nginx:nginx /etc/nginx/html安装完成后,现在启用 PHP MariaDB(系统启动时自动启动),启动 MariaDB,并使用以下命令验证状态:
开启php:
systemctl start php-fpm开启状态:
systemctl status php-fpm开机自动启动:
systemctl enable php-fpm重新启动:
systemctl restart php-fpm开启mariadb:
systemctl start mariadb开启状态:
systemctl status mariadb开机自动启动:
systemctl enable mariadb重新启动:
systemctl restart mariadbmysql或MariaDB安全加固:
会设置密码,界面1直接回车,剩的都选Y:
mysql_secure_installationroot登录:
mysql -u root -p查看当前的数据库:
show databases;创建数据库非root用户名密码:
create database wordpress; create user name@localhost identified by 'password';授予权限:
grant all privileges on wordpress.* to name@localhost; flush privileges;- 修改登录密码无效
ALTER USER root@localhost IDENTIFIED VIA mysql_native_password USING PASSWORD("password");退出:
exit开启BBR:
echo "net.core.default_qdisc=fq" >> /etc/sysctl.conf && echo "net.ipv4.tcp_congestion_control=bbr" >> /etc/sysctl.conf && sysctl -p && lsmod | grep bbr加载单元:
systemctl daemon-reload开启nginx:
systemctl start nginx开启状态:
systemctl status nginx开机自动启动:
systemctl enable nginx重新启动:
systemctl restart nginx停止nginx:
service nginx stop
dnf –setopt install_weak_deps=TRUE –skip-broken install \
bash-completion bzip2 file git-core make ncurses-devel patch \
rsync tar unzip wget which diffutils python3 perl perl-base \
perl-devel perl-Data-Dumper perl-File-Compare perl-File-Copy perl-FindBin \
perl-IPC-Cmd perl-JSON-PP perl-lib perl-Thread-Queue perl-Time-Piece \
gcc gcc-c++ zlib zlib-devel pcre pcre-devel \
openssl openssl-devel libxslt libxslt-devel gd gd-devel vim nano